Concepts addressed: Thin lenses and their properties, ray tracing.
Grade level: 11th
Scenario:
Last week it was I got a present from my aunt: a magnifying glass. She said it would be “really cool” if I used it to “watch ants carrying their food” – her words, not mine.
After inspecting the present, I noticed that it is a convergent lens – in particular, a biconvex lens.
As I started to wonder how to use it, I thought that I could just use what I’ve learnt in class to better understand what is going on.
Questions:
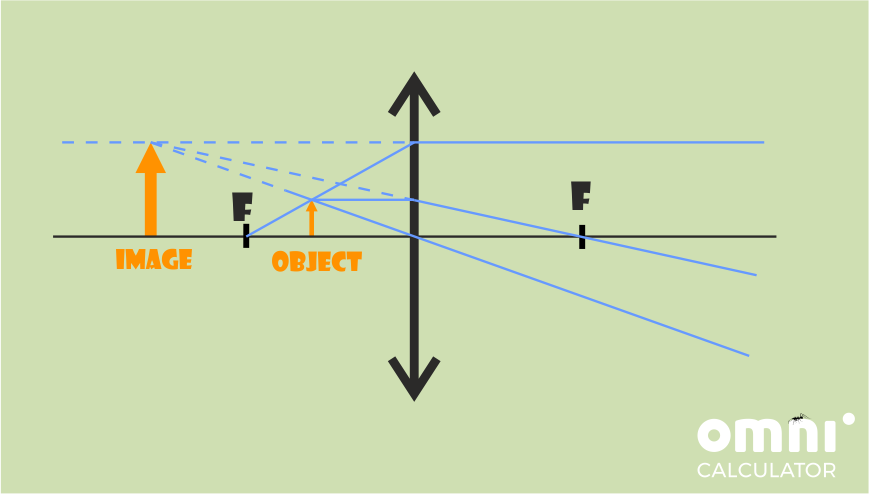
1. Draw the ray diagram for the magnifying glass when an object is between the focal point and the lens. Do the same for an object that is farther from the lens than the focal point.
2. From the 2 previous diagrams, which do you think is the right way to use a magnifying glass? Why? Is the image real or virtual?
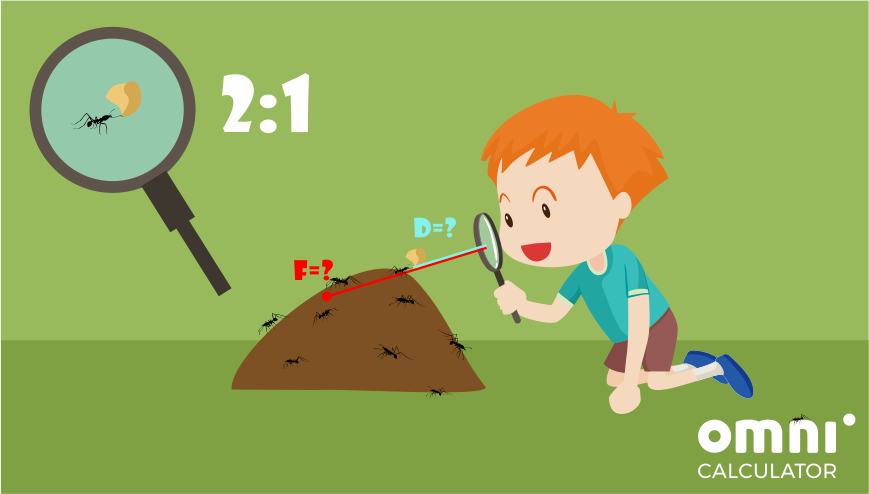
I read the instructions (this confinement is getting very boring, don’t judge!). They say that I should put the magnifying glass as close to my eye as possible, and then move my head and the magnifying glass together until the object appears sharp. Doing this, I should be able to get a crisp image with the advertised 2x magnification.
I want to be ready for the next time I see an ant carrying some bread crumbs!
Question:
3. How from an ant should I put the magnifying glass? What is the focal length of the magnifying glass?
Assume that I’m following the instructions. In that case, with my eye just about touching the lens, the smallest distance between my eye and the lens is 25.0 cm.
Bonus (optional): What happens if I move the lens closer/farther from the ant?
Useful calculators:
- Thin Lens Equation Calculator – https://www.omnicalculator.com/physics/thin-lens-equation
Question 1 hints:
Question 2 hints:
Question 3 hints:
Bonus Question hints:
Solutions:
Object further than focal point:
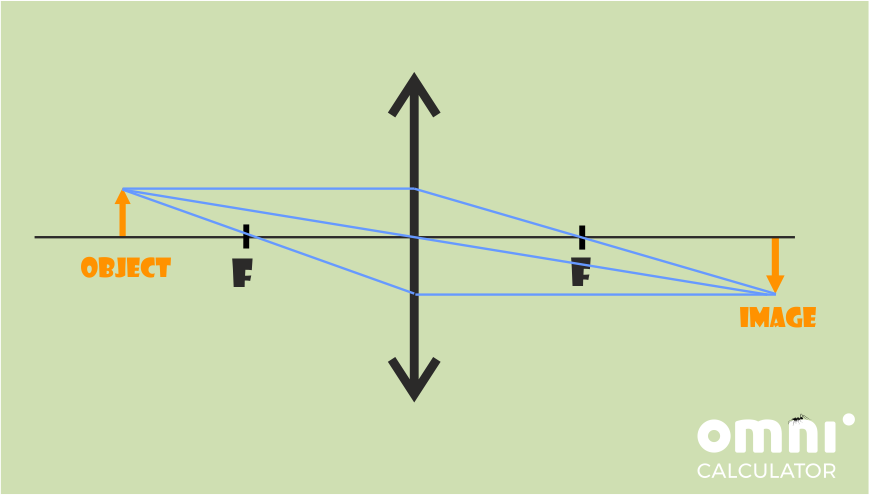
Image between focal point and lens:
Step-by-step solution:
- Draw the optical axis (a horizontal line) and the lens symbol (perpendicular to the optical axis).
- Draw the focal points and position the object according to the situation.
- Draw a light ray (straight line) from the top of the object to the lens, parallel to the optical axis. After the lens, continue the line, making it pass through the focal point on the image space.
- Draw a line from the top of the object going through the point where the lens symbol and the optical axis intersect. This line does not get deflected as it goes through the lens.
- (Optional) Draw a line that passes through the focal point, the top of the object, and the lens. After the lens, the line continues horizontally, parallel to the optical axis.
- If the rays don’t cross in the image space, extend them backward (dotted line) until they do. The resulting image will be virtual.
- Draw the image. The point where the rays cross is the top of the object.
Using the fact that both focal distances are positive for a convergent lens, we can create our ray diagram. Here are 2 examples of what the resulting diagrams should look like.
In the examples, the focal distances of the image and the object are similar, which is general property of magnifying glasses. If your drawings have different focal lengths, don’t worry, the focal lengths don’t have to be exactly the same. You can check your answers using the calculator/equation using any values, as long as the objects are located in the correct positions.
M = |y|/xBy substituting in the values we know (Magnification,
M, and distance to the image, |y|) we can calculate the distance from the object to the lens, x.2 = 25.0 cm / x => x = 25.0 cm/2 = 12.5 cm
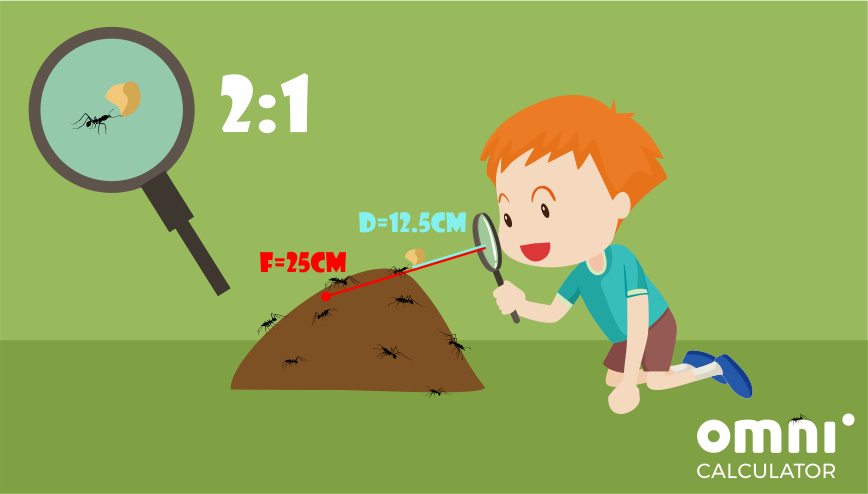
The object is precisely in the middle of the lens and the image.
Now that we know the position of the image and the object, we can calculate the focal distance of the magnifying glass using the thin lens equation:1/x + 1/y = 1/f
It is crucial to remember that because the image is virtual (exists on the object side), the value of y is negative (y = -25 cm). This was not important before, because we had an absolute value.
Now we substitute in the formula and solve for f (the focal distance):1/12.5 cm - 1/25.0 cm = 1/f => 1/25.0 cm = 1/f => f = 25.0 cm
The lens has a focal distance of 25.0 cm.

Moving away from the object:
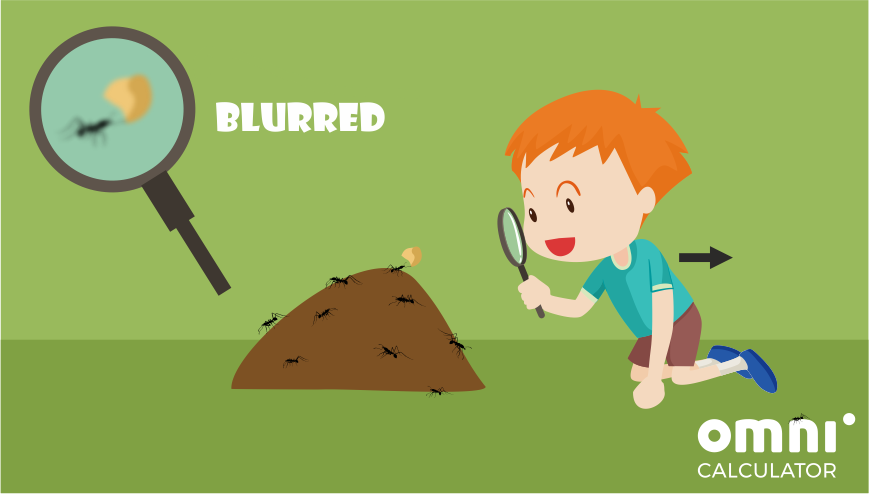
At first, moving away from the object with the lens close to your eye slowly reduces the magnification, and make everything blurry. This happens because the image is now formed in the image space, behind your eye.
You can check this by holding the lens still and moving your head farther and farther back – you should see the image getting larger and larger. Then it becomes a blurry mess. After that moment, if you keep moving back, the image should become more and more crisp, but it’ll also be upside down. You are now seeing the image we predicted in Question 1, where the object is farther from the lens and the focal point.
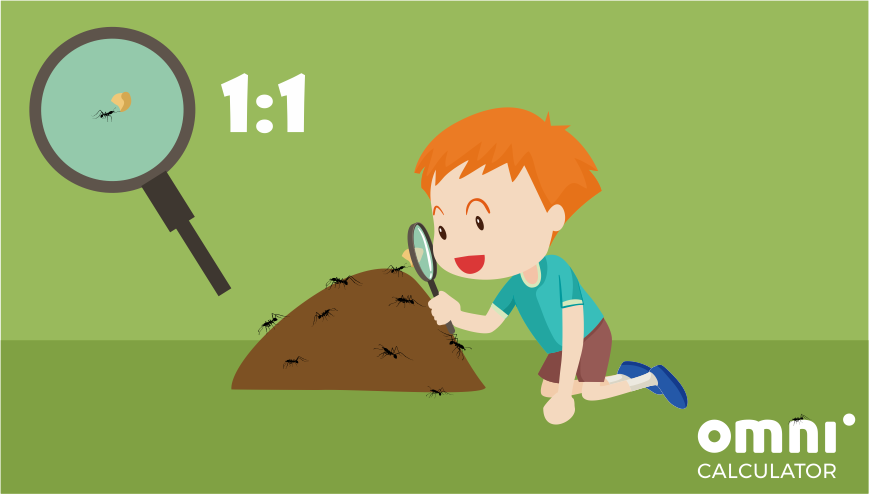
Moving closer to the object:
As we move closer to the object, the magnification will reduce. Since the image will form before it reaches the closest point of your eye, you will experience eye-strain at the beginning. After a while, it will just become blurry, as your eye cannot focus on the object/image anymore. At the very end (where the lens is touching the object), the lens will have almost no effect on the image of the object, and it will act like a flat piece of glass, like a window.